As a lighting contractor, understanding the various components of light fixtures is crucial for efficient installation and maintenance. One often overlooked aspect is the screw size used in these fixtures. Knowing the common screw sizes can save time and prevent frustration on the job site. This article provides essential tips and insights into light fixture screw sizes, ensuring that contractors are well-prepared for any lighting project.
Understanding Light Fixture Screw Sizes
Light fixtures come in a variety of designs and styles, each requiring specific screw sizes for assembly and installation. The screw size can impact the stability and safety of the fixture, making it essential for contractors to be familiar with the common sizes used in the industry.
Typically, light fixtures utilize a range of screw sizes, including but not limited to #8, #10, and 1/4-20 screws. Each size serves a unique purpose and is suited for different types of fixtures, from ceiling mounts to wall sconces. Understanding these sizes will help contractors select the right screws for their projects, ensuring a secure and reliable installation.
Common Screw Sizes
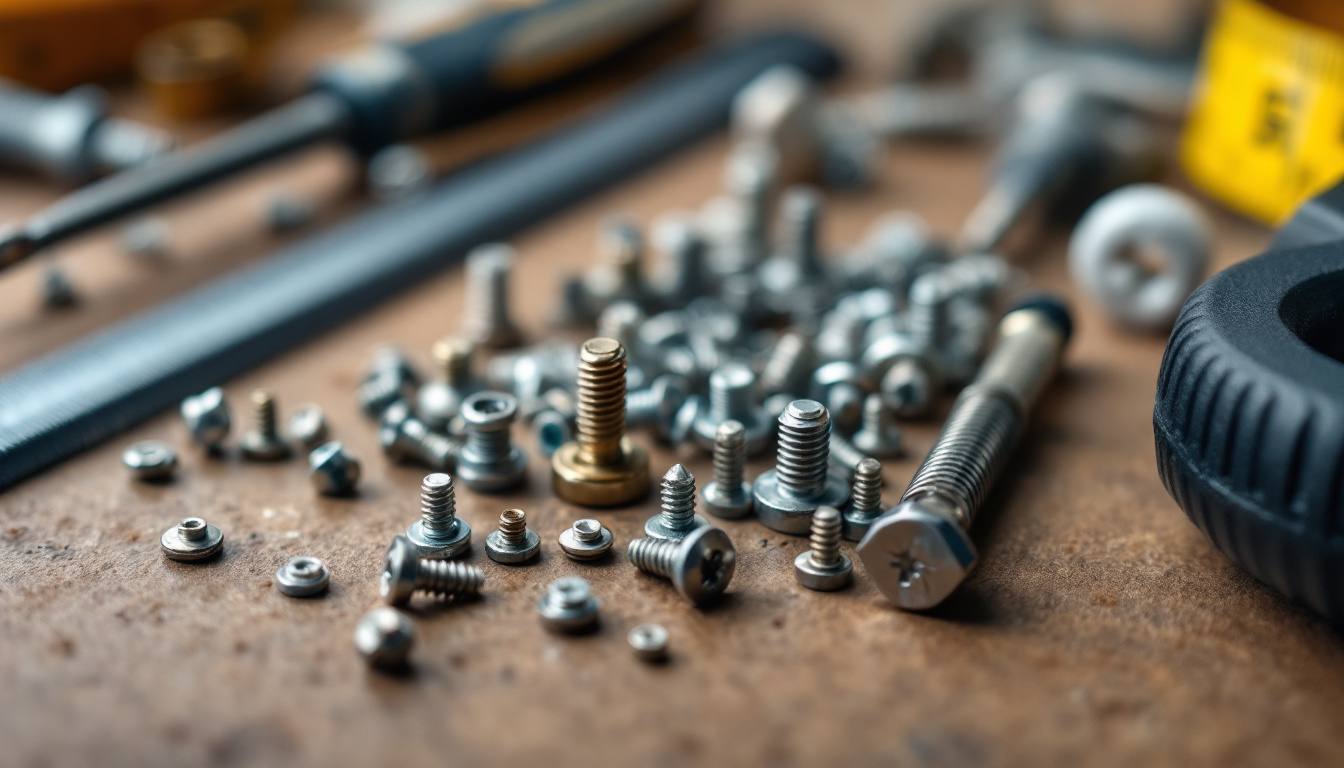
When it comes to light fixtures, the most commonly used screw sizes include:
- #8 Screws: These are often used in smaller fixtures, such as recessed lights and decorative wall sconces. Their size provides adequate support without being overly bulky.
- #10 Screws: Slightly larger than #8 screws, #10 screws are frequently found in medium-sized fixtures. They offer a balance of strength and ease of installation.
- 1/4-20 Screws: These screws are commonly used in heavier fixtures, such as chandeliers and larger ceiling mounts. Their robust design ensures stability and safety.
Choosing the Right Screw
Choosing the appropriate screw size for a light fixture is not just about compatibility; it also involves considering the weight and design of the fixture. For instance, a heavy chandelier will require more substantial screws compared to a lightweight pendant light. Additionally, the material of the fixture can influence the type of screw needed. Metal fixtures may require different screws compared to plastic ones, as the threading and grip can vary.
Contractors should also consider the length of the screws. Longer screws may be necessary for fixtures that need to be anchored securely to a ceiling or wall, while shorter screws may suffice for lighter installations. Always ensure that the screw length matches the thickness of the material being fastened to avoid any issues during installation.
Moreover, the finish of the screws can also play a crucial role in the overall aesthetics of the installation. For instance, using screws with a rust-resistant coating can not only enhance the longevity of the fixture but also maintain its visual appeal over time. Additionally, color-matched screws can help create a seamless look, especially in high-visibility areas. Contractors should be aware of these details to ensure that the installation is not only functional but also visually pleasing.
Furthermore, understanding the torque specifications for different screw sizes can significantly affect the installation process. Over-tightening screws can lead to stripped threads or damaged fixtures, while under-tightening can compromise the fixture’s stability. Therefore, using a torque wrench or a similar tool can help ensure that screws are tightened to the manufacturer’s recommended specifications, providing peace of mind that the installation will withstand the test of time and use.
Tools for Working with Light Fixture Screws
Having the right tools on hand can make a significant difference when working with light fixture screws. The following tools are essential for any lighting contractor:
Screwdrivers
A quality set of screwdrivers is crucial for installing light fixtures. Both flathead and Phillips screwdrivers should be included in your toolkit to accommodate various screw types. Magnetic screwdrivers can also be beneficial, as they help hold screws in place during installation, reducing the risk of dropping them. Additionally, consider investing in a precision screwdriver set for smaller fixtures or delicate components, as these can provide the finesse needed to navigate tight spaces without damaging surrounding materials.
Power Tools
For larger installations, power tools such as cordless drills can speed up the process. Using a drill with adjustable torque settings allows for precise control when driving screws into different materials. Additionally, having a set of drill bits that match the screw sizes will ensure that holes are pre-drilled correctly, preventing damage to the fixture or surrounding materials. A right-angle drill attachment can also be a valuable addition to your toolkit, particularly when working in confined areas where space is limited, allowing you to reach screws that would otherwise be inaccessible.
Measuring Tools
Accurate measurements are key to successful installations. A tape measure or laser level can help ensure that fixtures are installed at the correct height and alignment. This is particularly important for aesthetic reasons, as well as for ensuring that the light is distributed evenly in a space. Furthermore, a stud finder can be an invaluable tool when mounting heavier fixtures, as it helps locate the best points for securing screws into wall studs, providing additional support and stability for the installation. Using a combination square can also aid in marking precise locations for drilling, ensuring that every fixture is perfectly aligned with the design layout.
Installation Tips for Light Fixtures
Proper installation is vital for the longevity and functionality of light fixtures. Here are some tips that lighting contractors should keep in mind:
Secure Mounting
Always ensure that the fixture is securely mounted to a structural component, such as a ceiling joist or wall stud. This is especially important for heavier fixtures, which can pose safety risks if not properly supported. Using toggle bolts or anchors can provide additional support when mounting fixtures to drywall or other hollow surfaces. Additionally, consider the weight distribution of the fixture; for larger chandeliers or pendant lights, it may be beneficial to use multiple mounting points to evenly distribute the load, reducing the risk of sagging or detachment over time.
Wire Management
Effective wire management is essential for both safety and aesthetics. Ensure that all wiring is neatly tucked away and secured, preventing any potential hazards. Using wire nuts and electrical tape can help keep connections safe and organized. Furthermore, labeling wires can be a helpful practice, especially in complex installations with multiple fixtures or circuits. This not only aids in troubleshooting but also simplifies future maintenance or upgrades, making it easier to identify which wires correspond to specific fixtures.
Testing the Fixture
Before finalizing the installation, it is advisable to test the fixture. Turn on the power and check for any flickering lights or issues with the electrical connections. This step can help identify problems early, allowing for quick fixes before the job is completed. In addition to visual inspections, consider using a multimeter to check voltage levels and ensure that the fixture is receiving the correct power supply. This extra precaution can prevent potential electrical issues down the line and ensure that the fixture operates efficiently and safely.
Consider Energy Efficiency
When selecting light fixtures, it’s also important to consider energy efficiency. Opting for LED fixtures not only reduces energy consumption but also extends the lifespan of the lighting, resulting in lower maintenance costs over time. Additionally, incorporating dimmer switches can enhance energy savings and provide flexibility in lighting levels, allowing homeowners to create the perfect ambiance for any occasion. Educating clients about the benefits of energy-efficient lighting can also enhance their overall satisfaction with the installation.
Compliance with Local Codes
Lastly, always ensure that your installation complies with local electrical codes and regulations. Familiarize yourself with the specific requirements in your area, as they can vary significantly. This may include adhering to guidelines regarding fixture placement, wiring methods, and the use of specific materials. Staying informed about code changes not only protects your clients but also enhances your credibility as a professional contractor, ensuring that your work meets the highest safety standards.
Common Issues with Light Fixture Screws
Even with careful planning and execution, issues can arise during the installation of light fixtures. Understanding these common problems can help contractors troubleshoot effectively.
Stripped Screws
Stripped screws can be a frustrating issue, often occurring when screws are over-tightened or when the wrong size is used. To avoid this, always use the correct screwdriver for the screw type and size. If a screw becomes stripped, it may be necessary to use a screw extractor or to replace it with a larger screw.
Loose Fixtures
Loose fixtures can lead to wobbling or even falling, posing a safety risk. If a fixture feels loose after installation, double-check the screws and ensure they are tightened adequately. If the mounting hardware is damaged, it may need to be replaced to ensure a secure fit.
Compatibility Issues
Sometimes, screws may not fit properly due to compatibility issues between the fixture and the mounting surface. Always verify that the screws being used are compatible with the fixture and the surface material. If necessary, consult the manufacturer’s specifications for guidance.
Conclusion
Understanding light fixture screw sizes and their applications is essential for lighting contractors. By familiarizing themselves with common screw sizes, tools, and installation techniques, contractors can enhance their efficiency and ensure safe, reliable installations. Whether working with small sconces or large chandeliers, having the right knowledge and tools at hand will lead to successful lighting projects.
Ultimately, investing time in learning about light fixture screws and installation best practices will pay off in the long run, resulting in satisfied clients and a solid reputation in the industry. By following these quick tips, lighting contractors can navigate the complexities of light fixture installations with confidence and expertise.
Get Your Lighting Essentials at LumenWholesale
Ready to elevate your lighting projects with the right screws and fixtures? Look no further than LumenWholesale for all your lighting needs. Our extensive selection of spec-grade lighting products ensures you have access to high-quality, reliable options for every installation. With unbeatable wholesale prices and the convenience of free shipping on bulk orders, you can trust us to provide the best value without any hidden fees. Make your next project a shining success with premium lighting from LumenWholesale. Discover our range and take advantage of our exceptional deals by visiting Wholesale Lighting at the Best Value today.