canister lights, also known as recessed lights or downlights, are a popular choice among homeowners and commercial property managers alike. Their sleek design and ability to blend seamlessly into ceilings make them a favored lighting solution. However, like any fixture, they can wear out or become outdated. For lighting contractors, mastering the art of canister light replacement is essential for delivering quality service to clients. This article will delve into the secrets of successful canister light replacement, offering insights that can enhance your skills and efficiency.
Understanding Canister Lights
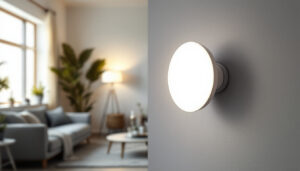
Before diving into the replacement process, it’s crucial to understand what canister lights are and how they function. These fixtures are typically installed in ceilings and provide a clean, modern look while offering versatile lighting options. They can be used for general illumination, task lighting, or accent lighting, depending on the needs of the space. Their unobtrusive design allows them to blend seamlessly into various interior styles, making them a popular choice among homeowners and designers alike.
In addition to their aesthetic appeal, canister lights are also energy-efficient, particularly when equipped with LED bulbs. This not only reduces electricity consumption but also contributes to a longer lifespan for the fixtures themselves. As energy efficiency becomes increasingly important in modern design, canister lights stand out as a practical solution for both new and existing homes, allowing for a balance of style and sustainability.
Types of Canister Lights
Canister lights come in various types, each designed for specific applications. The most common types include:
- New Construction Canister Lights: Designed for installation in new builds, these fixtures require framing and are usually installed before drywall is put up. This type allows for optimal placement and wiring, ensuring a clean finish.
- Remodel Canister Lights: Ideal for retrofitting existing spaces, these lights can be installed in ceilings with minimal disruption. They are perfect for homeowners looking to upgrade their lighting without undergoing extensive renovations.
- Adjustable Canister Lights: These fixtures allow for directional lighting, making them perfect for highlighting artwork or architectural features. Their flexibility makes them a favorite in spaces where mood and ambiance are key considerations.
Another type worth mentioning is the Smart Canister Lights, which integrate with home automation systems. These lights can be controlled via smartphone apps or voice commands, allowing users to adjust brightness, color temperature, and even set schedules for when the lights should turn on or off. This technology not only enhances convenience but also allows for personalized lighting experiences tailored to individual preferences.
Components of Canister Lights
Understanding the components of canister lights is essential for effective replacement. Key components include:
- Housing: The metal or plastic shell that holds the light bulb and wiring. The housing is crucial for heat dissipation, especially in LED fixtures, ensuring safety and longevity.
- Trim: The visible part of the fixture that can vary in style and finish. Trims come in various designs, including baffle, reflector, and adjustable options, which can dramatically change the look and feel of the lighting.
- Bulb: The light source, which can be LED, halogen, or incandescent. The choice of bulb affects not only the brightness and color of the light but also the energy efficiency of the fixture.
Additionally, some canister lights feature built-in dimmers or color-changing capabilities, allowing for even greater customization. This can be particularly beneficial in multi-functional spaces where different activities may require varying levels of light. Understanding these components and their functions will empower you to make informed decisions when replacing or upgrading your canister lights, ensuring you achieve the desired effect in your home.
Tools and Materials Needed for Replacement
Having the right tools and materials on hand can streamline the replacement process. Here’s a list of essential items that every lighting contractor should have:
Basic Tools
Investing in quality tools is crucial for any lighting contractor. The following tools are often necessary for canister light replacement:
- Wire Strippers: Essential for preparing and connecting electrical wires.
- Screwdrivers: Both flathead and Phillips screwdrivers are needed for various screws.
- Drill: Useful for making holes in ceilings or walls when necessary.
Safety Gear
Safety should always be a priority when working with electrical fixtures. Ensure you have the following safety gear:
- Safety Glasses: Protect your eyes from debris while cutting or drilling.
- Gloves: Wear gloves to protect your hands from sharp edges and electrical components.
- Hard Hat: If working in areas where overhead hazards exist, a hard hat is essential.
Replacement Parts
Having replacement parts readily available can save time and ensure a smooth replacement process. Common parts include:
- New Canister Fixture: Choose a fixture that matches the existing style and specifications.
- Bulbs: Stock various types of bulbs to accommodate different client preferences.
- Wiring Connectors: Ensure you have connectors for secure electrical connections.
Step-by-Step Guide to Canister Light Replacement
Replacing canister lights may seem straightforward, but following a systematic approach can prevent mistakes and ensure safety. Here’s a detailed guide to help you through the process:
1. Turn Off Power
Before starting any electrical work, always turn off the power at the circuit breaker. This step is crucial for ensuring safety while working on the fixture. Use a voltage tester to confirm that the power is off before proceeding.
2. Remove the Old Fixture
Begin by removing the trim from the old canister light. This may involve gently pulling it down or unscrewing it, depending on the design. Once the trim is off, you can access the housing. Disconnect the wiring by unscrewing the wire nuts and carefully separating the wires.
Next, remove the housing from the ceiling. This may involve unscrewing it from the ceiling joists or releasing clips that hold it in place. Take care not to damage the surrounding area during this process.
3. Install the New Fixture
Once the old fixture is removed, it’s time to install the new canister light. Begin by connecting the wiring. Match the wires from the new fixture to the corresponding wires in the ceiling, using wire nuts to secure the connections. Ensure that the connections are tight and insulated properly.
Next, secure the new housing in place according to the manufacturer’s instructions. If it’s a remodel canister, it may simply clip into place. For new construction fixtures, ensure that it is properly anchored to the framing.
4. Attach the Trim and Bulb
After the housing is secured, attach the trim to the fixture. Depending on the design, this may involve snapping it into place or securing it with screws. Finally, install the appropriate bulb, ensuring it is compatible with the fixture and meets the desired brightness and color temperature.
5. Restore Power and Test
Once everything is securely in place, restore power at the circuit breaker. Test the new canister light to ensure it functions correctly. If it does not turn on, double-check the wiring connections and ensure the bulb is properly installed.
Common Challenges and Solutions
Even experienced lighting contractors may encounter challenges during canister light replacement. Here are some common issues and effective solutions:
Difficulty Accessing the Fixture
In some cases, canister lights may be installed in hard-to-reach areas. If this is the case, consider using a sturdy ladder or scaffolding to gain access. For particularly challenging installations, a flexible extension tool can help maneuver in tight spaces.
Incompatible Wiring
Occasionally, the wiring in older homes may not be compatible with modern fixtures. If you encounter this issue, it may be necessary to rewire the fixture or consult with an electrician for assistance. Always prioritize safety and compliance with local electrical codes.
Bulb Compatibility Issues
With the rise of LED technology, many contractors face challenges related to bulb compatibility. Ensure that the new fixture is rated for the type of bulb being used, and be aware of any dimming capabilities if the client desires adjustable lighting. Providing clients with options and recommendations can enhance their satisfaction with the final product.
Best Practices for Lighting Contractors
To excel in canister light replacement, lighting contractors should adopt best practices that enhance their professionalism and service quality. Here are some key strategies:
Stay Updated on Trends
The lighting industry is constantly evolving, with new technologies and design trends emerging regularly. Staying informed about the latest advancements in canister lights, such as energy-efficient options and smart lighting solutions, can set contractors apart from the competition. Attend trade shows, workshops, and online webinars to keep your knowledge current.
Communicate with Clients
Effective communication with clients is essential for successful projects. Take the time to discuss their needs, preferences, and budget before starting any work. Providing clear explanations about the replacement process and potential options can help manage expectations and build trust.
Document Your Work
Keeping detailed records of your projects can be beneficial for both you and your clients. Documenting the type of fixtures installed, wiring configurations, and any challenges encountered can serve as a reference for future work or maintenance. This practice can also enhance your reputation as a thorough and professional contractor.
Conclusion
Mastering canister light replacement is a valuable skill for lighting contractors. By understanding the components, having the right tools, and following a systematic replacement process, contractors can ensure a successful outcome for their clients. Additionally, staying informed about industry trends and maintaining open communication can enhance the overall client experience.
In an ever-evolving industry, the ability to adapt and learn is essential for success. By implementing the secrets shared in this article, lighting contractors can elevate their service quality and become trusted experts in canister light replacement.
Upgrade Your Lighting Game with LumenWholesale
Ready to take your canister light replacement services to the next level? At LumenWholesale, we provide lighting contractors with the highest quality, spec-grade lighting products at prices that simply can’t be beaten. Say goodbye to the middleman and hello to our extensive selection of reliable, high-performance lighting that meets the most rigorous industry standards. With free shipping on bulk orders, you can stock up on premium lighting solutions and pass on the savings to your clients. Elevate your projects with the perfect combination of quality, affordability, and convenience. Discover the best value in wholesale lighting by visiting LumenWholesale today.